
Yield: 3–4 servings | Prep Time: 10 minutes | Cook Time: 15 minutes | Total Time: 25 minutes
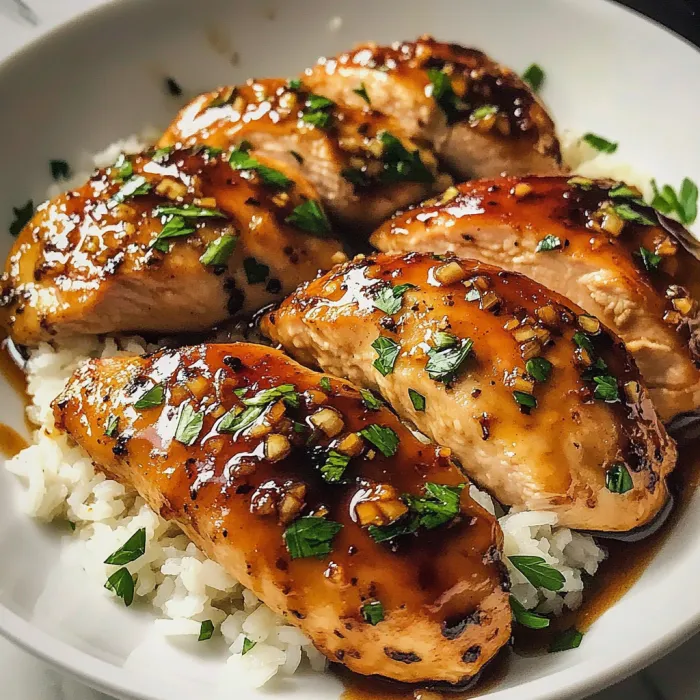
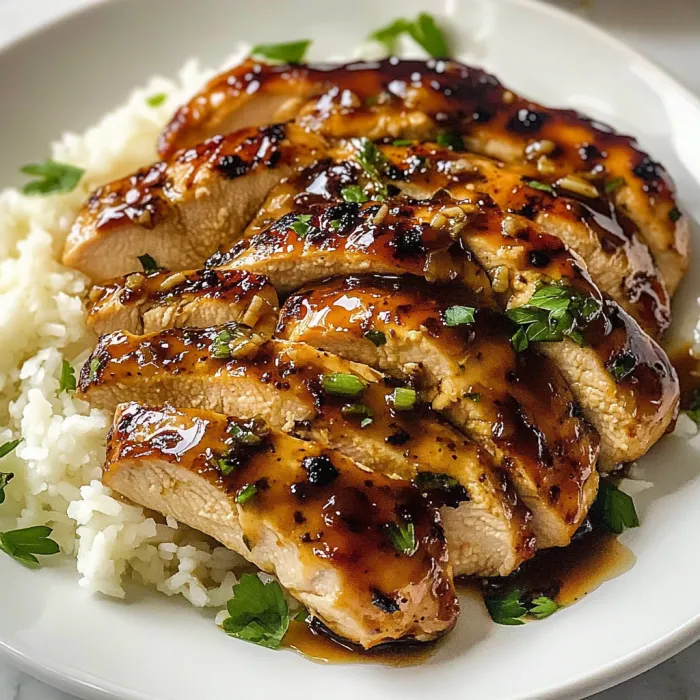
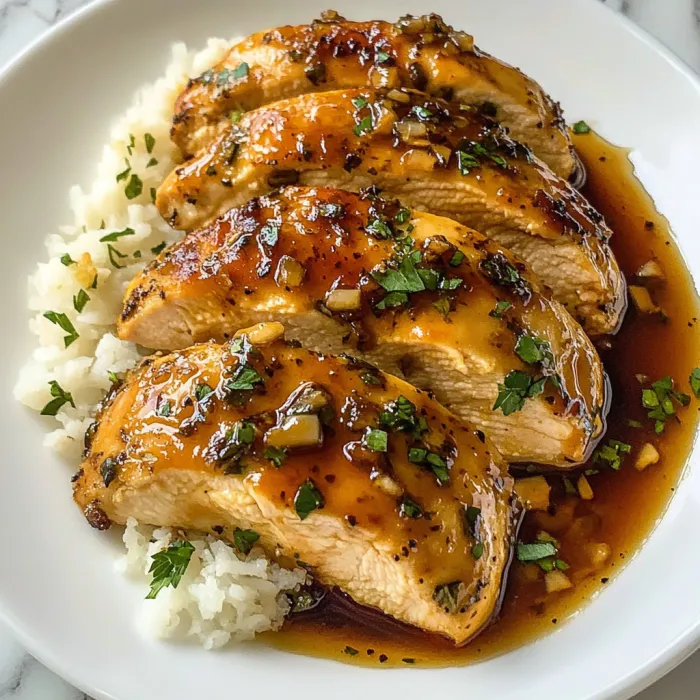
Crispy pan-seared chicken breasts coated in a glossy, sticky-sweet honey garlic glaze—this recipe is quick enough for weeknights but tastes like something you’d order at your favorite bistro. It’s simple, crowd-pleasing, and made with pantry staples. Whether you’re cooking for family or meal prepping for the week, these Honey Garlic Chicken Breasts bring together bold flavor and comforting texture in one skillet. It’s the kind of dinner that gets everyone asking for seconds—and it only takes 25 minutes from start to finish.
🛒 Ingredients
→ Chicken & Coating
01 – 1 pound boneless skinless chicken breasts
02 – 1/4 cup all-purpose flour
03 – 1 tablespoon olive oil
04 – 2 tablespoons butter, divided
→ Honey Garlic Sauce
05 – 6 cloves garlic, thinly sliced
06 – 1/4 cup soy sauce
07 – 1 tablespoon seasoned rice vinegar (or regular rice vinegar)
08 – 1/3 cup honey
→ Seasoning & Garnish
09 – Kosher salt, to taste
10 – Freshly cracked black pepper, to taste
11 – Green onions, thinly sliced (for garnish)
🔪 Instructions
01 – Prepare the skillet. In a large frying pan or skillet, heat the olive oil and 1 tablespoon of butter over medium to medium-high heat.
02 – Slice and season the chicken. If using thick chicken breasts, slice them in half lengthwise to create thinner cutlets (you’ll end up with 4 thin pieces). Pat dry with a paper towel, then season both sides with salt and pepper. Dredge lightly in flour, shaking off any excess.
03 – Sear the chicken. Place the floured chicken into the hot skillet. Cook for 4–5 minutes per side, or until the exterior is golden brown and the inside is cooked through. Remove from the pan and set aside on a plate.
04 – Sauté the garlic. Reduce heat to medium-low. In the same pan, add the remaining tablespoon of butter and the sliced garlic. Sauté for about 30–60 seconds, just until fragrant and slightly softened—do not let it burn.
05 – Build the sauce. Pour in the soy sauce and rice vinegar, scraping up any flavorful brown bits stuck to the pan. Stir in the honey, a pinch of salt, and black pepper. Simmer the sauce gently for 4–5 minutes until it slightly thickens and becomes glossy.
06 – Return chicken to pan. Place the cooked chicken back into the skillet, spooning the sauce over each piece to fully coat. Let it simmer for 1 minute until warmed through and beautifully glazed.
07 – Finish and garnish. Plate the chicken and drizzle extra sauce over the top. Sprinkle with freshly sliced green onions for a pop of color and bite. Serve immediately.
🍽 Serving Suggestions
Over rice: Spoon that sweet-savory sauce right over fluffy jasmine or basmati rice for a satisfying meal.
With noodles: Serve with soba or rice noodles and sautéed veggies like bok choy or snap peas.
Low-carb: Try it with cauliflower rice or a fresh cucumber salad.
Make it spicy: Add red pepper flakes or a dash of sriracha to the sauce for heat lovers.
📝 Notes & Tips
Slice the chicken evenly so it cooks at the same rate—this also helps it sear beautifully.
Use fresh garlic for best flavor. Pre-minced garlic will work, but thin slices create more aroma and texture in the sauce.
Don’t skip the flour coating. It gives the chicken a lightly crisped edge that holds up under the glaze.
Double the sauce if you’re a fan of extra drizzle—it’s amazing on rice and vegetables.
🧊 Storage & Reheating
Store any leftovers in an airtight container in the fridge for up to 3 days. Reheat gently on the stovetop over low heat or in the microwave in 30-second bursts, adding a splash of water to loosen the sauce if needed.
❓ Frequently Asked Questions
Can I use chicken thighs instead of breasts?
Yes! Boneless, skinless chicken thighs work beautifully in this recipe. They may need an extra minute or two of cook time, but they’ll stay juicy and flavorful.
What can I use instead of rice vinegar?
Apple cider vinegar or white wine vinegar can work in a pinch. If using plain white vinegar, use slightly less as it’s more acidic.
Is this recipe gluten-free?
To make it gluten-free, substitute all-purpose flour with a gluten-free flour blend and make sure to use tamari instead of soy sauce.
How spicy is it?
This version isn’t spicy at all, but you can add red pepper flakes or a squirt of sriracha to the sauce if you like a little heat.
Can I make it ahead of time?
You can prep the chicken and the sauce in advance, but for the best texture and flavor, sear and simmer the chicken fresh. Leftovers reheat well, though!
What sides go best with this dish?
Classic white rice or jasmine rice, roasted veggies, stir-fried greens, soba noodles, or a crisp cucumber salad all pair beautifully with the sweet-salty sauce.
This Honey Garlic Chicken is proof that fast dinners don’t have to be boring. With just a few simple ingredients, one pan, and less than 30 minutes, you’ve got a dish that’s both cozy and crave-worthy. Perfect for weeknights, yet fancy enough for guests—just don’t forget the extra napkins. That glaze is sticky in the best way.
Print
Honey Garlic Chicken Breasts
- Total Time: 25 minutes
- Yield: 3–4 servings
Description
Sticky, sweet, and garlicky with a golden pan-seared crust—these Honey Garlic Chicken Breasts are weeknight magic. With just a handful of pantry ingredients and one skillet, you’ll have a restaurant-worthy meal in under 30 minutes. Perfect over rice, noodles, or veggies, this versatile chicken dish is sure to make it into your weekly dinner rotation.
Ingredients
→ Chicken & Coating
01 – 1 pound boneless skinless chicken breasts
02 – 1/4 cup all-purpose flour
03 – 1 tablespoon olive oil
04 – 2 tablespoons butter, divided
→ Honey Garlic Sauce
05 – 6 cloves garlic, thinly sliced
06 – 1/4 cup soy sauce
07 – 1 tablespoon seasoned rice vinegar
08 – 1/3 cup honey
→ Seasoning & Garnish
09 – Kosher salt, to taste
10 – Freshly cracked black pepper, to taste
11 – Green onions, thinly sliced (for garnish)
Instructions
01 – Heat olive oil and 1 tablespoon of butter in a large skillet over medium to medium-high heat.
02 – Slice chicken breasts lengthwise to create 4 thinner pieces. Season with salt and pepper on both sides, then dredge in flour.
03 – Sear chicken 4–5 minutes per side until golden brown and cooked through. Transfer to a plate and set aside.
04 – Lower the heat to medium-low. Melt remaining butter in the same skillet. Add sliced garlic and cook 30–60 seconds until fragrant.
05 – Add soy sauce and vinegar, scraping up the browned bits. Stir in honey, salt, and pepper. Simmer for 4–5 minutes until slightly thickened.
06 – Return chicken to the skillet. Coat in sauce and simmer 1 minute until heated through.
07 – Garnish with green onions and serve with extra sauce spooned over the top.
Notes
Use thin chicken cutlets to ensure even cooking. Don’t burn the garlic—it only needs 30–60 seconds in the butter. Want extra sauce for drizzling over sides? Double the sauce ingredients.
- Prep Time: 10 minutes
- Cook Time: 15 minutes