
Quick Overview
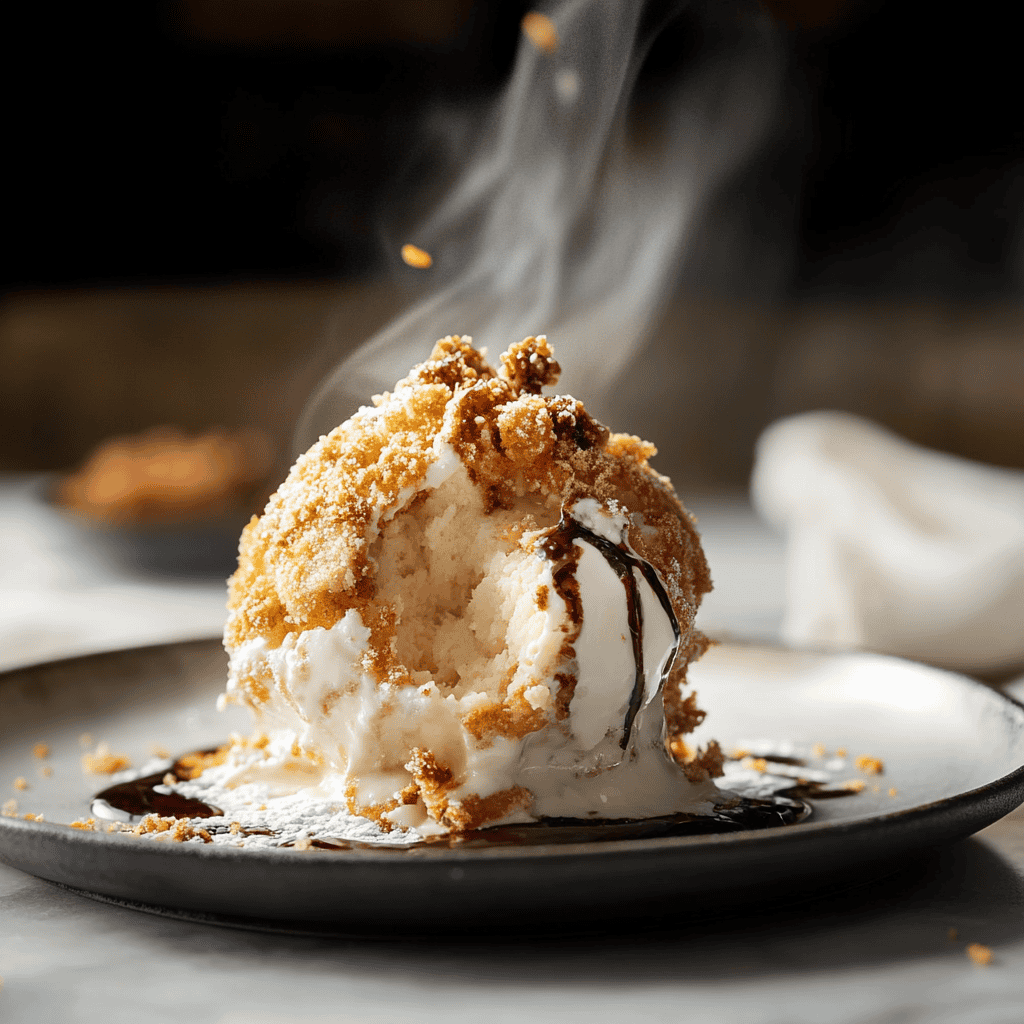
Fried ice cream is a delightful dessert that combines the creamy goodness of ice cream with a crispy outer layer. This indulgent treat is not only delicious but also fun to make at home. Imagine biting into a crunchy shell and discovering the cold, smooth ice cream within. In this article, we will guide you through the process of making your own fried ice cream from scratch.
Ingredient Breakdown
Ice Cream
To start your fried ice cream journey, choose your favorite flavor of ice cream. About 4 cups of premium vanilla or chocolate work wonders as they provide a rich base for frying.
Cornflakes
Using 2 cups of crushed cornflakes adds the perfect crunch to your fried ice cream. The cornflakes create a satisfying texture that complements the creamy interior.
Flour
You will need 1 cup of all-purpose flour for the batter. This helps form a protective layer around the ice cream so it stays intact during frying.
Eggs
Two large eggs are necessary for binding the batter. They help create a smooth mixture that coats the cornflakes and flour evenly.
Cinnamon
A teaspoon of ground cinnamon enhances the flavor profile. It adds warmth and depth to the outer coating of your fried ice cream.
Vegetable Oil
You will require enough vegetable oil for deep frying—about 3 cups should suffice. The oil needs to be hot enough to crisp up the coating while keeping the inside cold.
Step By Step Recipe: Fried Ice Cream
Step 1: Prepare Ice Cream Balls
Scoop out about 1/4 cup of your chosen ice cream and roll it into balls using your hands or an ice cream scoop. Place them on a baking sheet lined with parchment paper. Freeze these balls for at least 4 hours or until solid.
Step 2: Crush Cornflakes
While waiting for the ice cream balls to freeze, crush approximately 2 cups of cornflakes into small pieces using a rolling pin or food processor. You want them to be finely crushed but not powdered for optimal crunchiness.
Step 3: Make Batter Mixture
In a bowl, combine 1 cup of all-purpose flour and one teaspoon of cinnamon. In another bowl, whisk together two large eggs until well beaten. This mixture will serve as your batter for coating the frozen balls.
Step 4: Coat Ice Cream Balls
Once your ice cream balls are frozen solid, dip each ball first into the flour-cinnamon mixture and then into the egg wash. Ensure they’re coated evenly before rolling them in crushed cornflakes until fully covered.
Step 5: Freeze Again
After coating each ball with cornflakes, place them back on the baking sheet and return them to the freezer for an additional hour. This step allows the coating to firm up before frying.
Step 6: Heat Oil for Frying
In a deep pan or fryer, heat approximately three cups of vegetable oil over medium-high heat until it reaches about 350°F (175°C). A thermometer can help ensure accurate temperature; too low may result in soggy coating while too high could burn it.
Step 7: Fry Ice Cream Balls
Carefully lower each coated ice cream ball into the hot oil using a slotted spoon or spider strainer. Fry them for about 20-30 seconds until golden brown and crispy on all sides. Do not overcrowd the pan; fry in batches if necessary.
Step 8: Drain Excess Oil
Once cooked, remove each ball from the oil and let it drain on paper towels to absorb excess oil. This step ensures that your fried ice cream is not greasy when served.
Serving and Storing Tips
Serving Suggestion
Serve fried ice cream immediately after frying while it’s still warm and crispy. You can drizzle chocolate sauce or caramel over it and add whipped cream or sprinkles for extra flair!
Storage Instructions
If you have leftovers (which is rare), store them in an airtight container in your freezer for up to one week. Re-frying is not recommended as it may compromise texture; enjoy them fresh!
This simple yet delightful recipe for fried ice cream promises to impress family and friends alike! Whether you’re hosting a gathering or simply treating yourself, this dessert will surely be a hit. Happy cooking!
Mistakes to avoid
When making fried ice cream, avoid using soft ice cream. Soft ice cream will melt too quickly during frying, resulting in a soggy mess. Instead, choose a firmer variety that can hold its shape.
Another common mistake is not freezing the scoops long enough. Ensure the ice cream balls are frozen for at least 4 hours before frying. This extra time allows them to firm up, making frying more effective.
Additionally, don’t skip the coating process. A proper coating of crushed cornflakes or breadcrumbs protects the ice cream from melting too fast and adds a delightful crunch.
Lastly, avoid frying at the wrong temperature. If the oil is not hot enough, the coating won’t crisp up properly. Aim for a temperature of around 350°F (175°C) for optimal results.
Tips and tricks
To achieve perfect fried ice cream, start with high-quality ingredients. Choosing premium ice cream will enhance flavor and texture. Consider flavors like vanilla or chocolate that pair well with toppings.
When preparing to fry, use a deep fryer or a heavy-bottomed pan filled with oil. This ensures even cooking and prevents the oil from cooling down too much when you add the ice cream.
Timing is crucial; fry each ball for only 20-30 seconds to achieve a golden-brown crust without compromising the inside. Work in small batches to maintain oil temperature.
Experiment with toppings after frying! Drizzle chocolate syrup or caramel sauce over your fried ice cream for added flavor. A sprinkle of powdered sugar can elevate its presentation and taste.
Lastly, serve your fried ice cream immediately after frying to enjoy its warm exterior and cold core. This contrast creates an enjoyable experience that everyone will love.
Suggestions for Fried Ice Cream
For added flavor, consider rolling your ice cream balls in crushed nuts before frying. Almonds or pecans provide a delightful crunch and nutty taste that complements the sweetness of the ice cream perfectly.
Pair your fried ice cream with fresh fruit like strawberries or bananas on the side. This not only adds color but also balances out the richness of the dessert with some freshness.
If you want to get creative, try infusing your fried ice cream with flavors like matcha or espresso. These unique combinations can surprise your guests and make your dish stand out at any gathering.
Don’t forget about serving options! Present your fried ice cream in a bowl topped with whipped cream or sprinkles for an eye-catching treat that’s perfect for special occasions or casual gatherings.
FAQs
What is Fried Ice Cream made of?
Fried Ice Cream consists of scoops of hard-frozen ice cream coated in a layer of crunchy breadcrumbs or cornflakes, which gives it texture when deep-fried quickly in hot oil.
Is Fried Ice Cream safe to eat?
Yes, Fried Ice Cream is safe to eat as long as it is prepared correctly. Ensure that the oil reaches a high enough temperature so that it cooks quickly without melting the ice cream inside.
Can I make Fried Ice Cream ahead of time?
While you can prepare the coating in advance, it’s best to freeze the scooped ice cream balls until just before frying to ensure they maintain their shape and texture during cooking.
What are some popular toppings for Fried Ice Cream?
Common toppings include chocolate syrup, caramel sauce, whipped cream, and fresh fruit like strawberries or bananas that add both flavor and visual appeal to this delicious dessert.
Can I use dairy-free alternatives for Fried Ice Cream?
Absolutely! You can use dairy-free ice creams made from almond milk, coconut milk, or soy milk as substitutes while keeping all other ingredients unchanged for those with dietary restrictions.
What type of oil is best for frying?
Neutral oils such as vegetable oil or canola oil work best for frying Fried Ice Cream due to their high smoke points and lack of strong flavors that might interfere with your dessert’s taste.
Summary
In summary, making fried ice cream involves avoiding pitfalls like using soft ice cream and not allowing adequate freezing time. Utilize high-quality ingredients and follow precise frying techniques for optimal results. Experimenting with different coatings and toppings can elevate this delightful treat even further. Enjoy your creation immediately after frying for the best experience!